


snazzymag velvet kit
snazzymag velvet kit
Couldn't load pickup availability
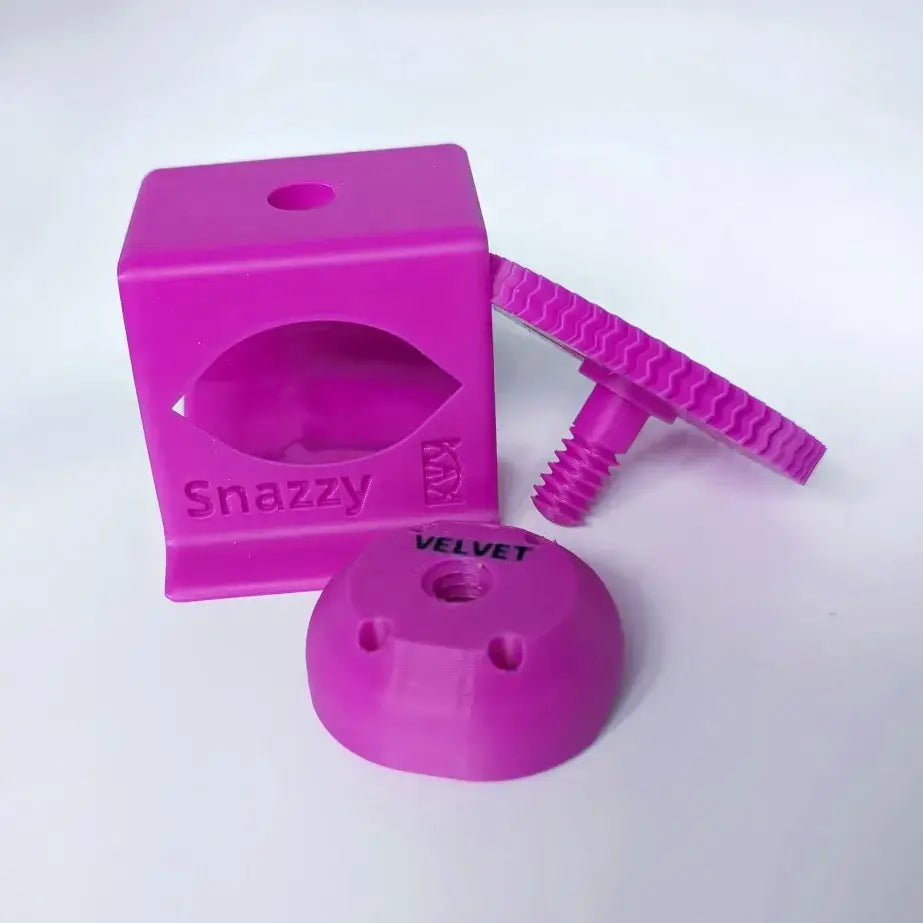
This 3d printed magnetic polish nail art system from Snazzy_L features magnetic "pucks" hung from a spinnable wheel for a range of magnetic nail art looks. Additional design cartridges are available. To add cartridges to the system, you will need the adapter/diy accessory to hold them.
Add Snazberries, the magnetic polish made just for this kit (shown in swatches here) for just $10 with any kit!
Velvet kit includes:
- Stand
- Velvet puck
- Wheel
Available in mint green, fuchsia and lavender. Colors may slightly vary from photos.
For more details, tips and tricks, visit the SnazzyMag website.
Share


Collapsible content
Instructions
Set the height of the puck on the wheel prior to polishing by twisting it up and down the threads of the wheel. After polishing, pull the wheel upwards, insert your finger and allow the puck to settle over your nail. After magnetizing, lift the wheel up again and slide your finger back out.
You can place a finger from either direction in the base. The finger rest is created as a guide for various depths and fingernail lengths. As a starting point, side “A” is intended for shorter fingernails and side “B” for longer. The side windows can aid in placement.
The VELVET puck can be used to create a velvet or glass bead effect. Gently spin the wheel to create a glass bead look.
The DIY cartridge has a magnetic plate installed inside on the blank side to use with your existing magnets.
The magnet and DIY cartridges can be snapped into the adapter in three places and the wheel can be twisted to multiple positions. Try various combinations of angles, depth of the cartridge, height of the puck as well as finger placement to achieve unique effects. Swatch sticks will need to be lifted up to the height of your fingernail to accurately test your variations. Click here for more details.
Important safety information
Take all necessary precautions and safety measures regarding magnets. Keep magnets away from electronics, pacemakers, credit cards, each other, etc. Magnets snap together with a surprising speed and force and can pinch you. They are also brittle and can send sharp fragments flying if they shatter.
The VELVET and VORTEX pucks are assembled with four individual magnets and were tested to have the same or greater pull as a 30 lb horseshoe magnet. The magnets have been installed with adhesive, but may still breakaway if placed near a stronger magnet.
The pucks are shipped with a stainless steel cover for safety. Please replace it when the puck is not in use. Similarly, the cartridges have their own plastic slide to protect it during shipping and to minimize magnets attracting on your work surface.
Attracted magnets, cartridges and metal safety covers should always be separated by sliding sideways.
Cleaning and care
Clean all pieces with mild soap and water only. Harsh chemicals such as acetone may dissolve or ruin the PLA printed parts. Dried nail polish can be gently scraped away. Take care not to allow the system to sit in extreme temperatures such as a hot car for extended periods. Minor blemishes or imperfections may be present in the printed parts or the pre-fab magnet pieces.